Nuts About Nuts: Squirrels in the Parks

12027273_10153009671001269_202430138757491343_o

Photo: Melissa McMasters

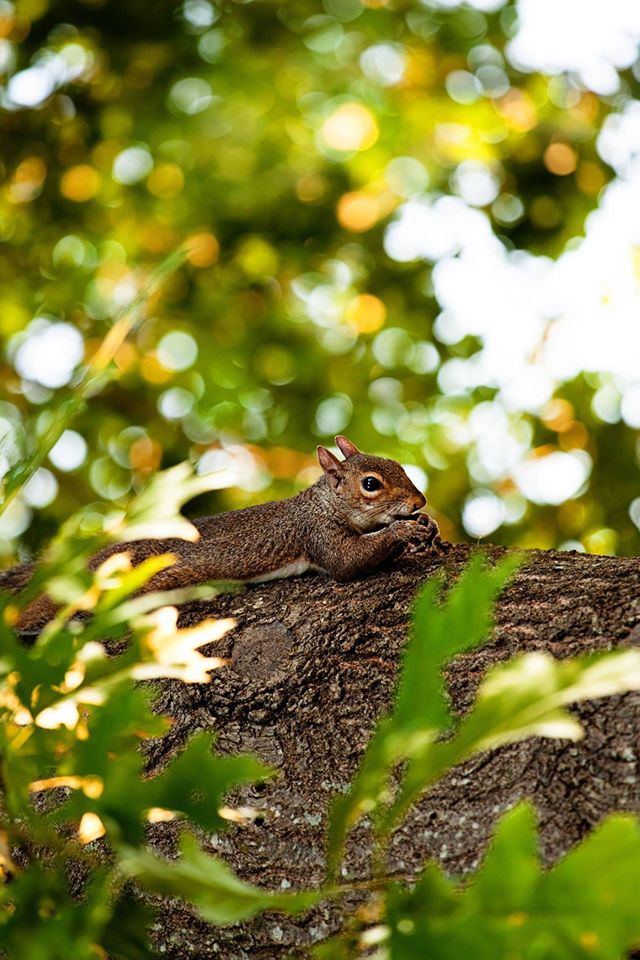
As birds head south and the buzz of insects fades, the parks in late fall start to really quiet down. Except, of course, for the scuttle of a certain woodland creature that always seems to be on the move. Eastern gray squirrels, the most common species of squirrel in Western Pennsylvania, can be seen dashing across open fields and scaling tree branches like highly skilled trapeze artists.

If you think that squirrels seem to be always in a hurry, you’re right. For them, it’s all about survival in the form of finding — and hiding — food.

Local eastern gray squirrels (which can also be black in color) aren’t hibernators. In the winter they primarily survive on “mast,” or the nuts of hardwood forest trees such as oaks, beeches, walnut and hickory. These nuts are packed full of nutritious goodness that provides squirrels with the calories they need to build up layers of fat to survive the winter.

Gray squirrels store the nuts in “cache zones” (read: all over the place) so that they can access them during the winter months. They actually hide too many nuts to eat. So, inadvertently, squirrels are planting seeds throughout forest habitats that will someday grow to be new trees. These trees in turn provide food and shelter for forest animals, birds and other creatures that depend on hardwood trees for their survival.

Gray squirrels prefer to nest in tree cavities and will often take over abandoned woodpecker nests. They also construct nests by densely packing together leaves, sticks and other materials. Now is a good time to spot squirrel nests — just look for big bunches of leaves clustered near the tops of tree.

It’s easy to understand why squirrels are so skittish when you consider that their primary predators are birds of prey, particularly hawks and owls. Snakes and skunks also are glad to add squirrel to their dinner menu.

Getting a closer look at these little park residents is easy — building a squirrel feeder in your yard is a fun family activity that will keep your yard active all winter long. Find our squirrel feeder guide here!

What Dreams May Come: Cliffside Artwork Makes Dreams Reality

One of Pittsburgh’s parks will soon make children’s dreams a reality.

Taking inspiration from Cliffside Park’s unique vantage and the dreams of little ones from the community, local artist Leslie Ansley is creating a new art piece to be installed in the renovated park.

art project 5

art project 2

Ms. Ansley has developed designs that celebrate flight and soaring visions – peregrine falcons, kites, butterflies, dandelion fluff, and the like. On a recent Saturday, children from the Hill District put pencil to paper to share their own soaring thoughts and creativity at an open workshop; their contributions will be incorporated into this new piece of art.

art project 4

The work, to be applied to the park’s entry walkway and an adjacent retaining wall, will also reflect the dreams and aspirations of Amon Cashmere Harris, son of community leader and resident Tyian Battle, who died suddenly at a young age. His dreams of traveling to Paris to see the iconic city were the inspiration for the art deco inspired designs that Ms. Ansley has created, which are also evocative of the design vocabulary of the Hill District in its heyday.

Cliffside Park itself is a reality dreamt up by the community, the entire restoration having been driven and informed by neighbors in the Hill. Like art on a fridge, this art piece will give a sense of home to this community space.

Stay tuned for more information on this exciting project. Cliffside Park and play areas are currently under construction and will open in Summer 2016.

art project 3

9 Ways to Get Your Kids Exploring Nature — Anywhere!

Parks are not only some of the very best playgrounds, but also amazing classrooms. By observing, touching, smelling and hearing the natural world, kids (and adults!) are learning, sometimes without even knowing it.

This year, our Homewood Naturalist Educator and Parks Conservancy educators have been taking the parks to communities, showing kids and their adults that nature is wherever they are. Through Buzzword, Nature in Your Neighborhood, and Raising Reader events, we’re working with partners and getting kids active, learning, and jazzed about the outdoors.

Want your kids to stay curious? Read on for some of our favorite family friendly activities that you can do on a walk through your neighborhood, a hike through the park — anywhere!

Cloud grin by Teri Clark

Cloud grin by Teri Clark

1. Keep Your Head in the Clouds

Is that a bird? A plane? What about a big fluffy marshmallow? Find a nice comfy spot on the grass, look up, and let your imagination do its thing.

2. I Spy with My Little Eye…

Nature! Keep your eyes peeled in your backyard or sitting on a park bench when you play “I Spy,” and you’ll be surprised at all that you see.

3. Match Swatches

With just a few color swatches from a hardware or paint store, you’re ready for a color scavenger hunt. Let the kids match colors from the swatches with those they find in a garden or even in a business district. The greater the variety of colors, the bigger the challenge.

4. Make Words Jump off the Page

Kids and parents had a blast bringing books to life on Raising Readers and Nature in Your Neighborhood hikes. After reading aloud books with outdoor themes, they took a walk to spot (and reinforce) what they read. Some fan favorites are Something Beautiful, Tree Pittsburgh’s If We Were to Plant a Tree, and The Very Hungry Caterpillar.

RR_NIYN

Raising Readers hike with Parks Conservancy and PAEYC educators.

5. Pack a Lunch

The ingredients for the perfect picnic are simple: One large blanket or sheet; one basket of sandwiches, drinks, and fruit; and whoever wants to eat! Picking a spot is easy — grab the best patch of grass you can find, then sit on it.

crafternoon

Painting a flower pot in Frick Park.

6. Have a Crafternoon

The limit to the number of projects that can be done with a little glue, paint, construction paper, and objects found on a hike is imagination. Paint a rock like a rockstar, make a daisy chain crown, or draw a picture of something you see in the parks.

7. Be a Good Helper

We all love to live and play in places that are beautiful. Your little ones can have a hand in making their favorite playground even better by being a good helper and cleaning up litter. Who knows, maybe this will even inspire them to clean their rooms!

8. Bug Out with Entymology

Creepy crawlies aren’t so creepy crawly when we give them a closer look. How many insects can kids find on a walk through the woods? Sweep insects into a net or a bug jar to get a closer look before setting them free.

9. Rain, Rain, Go and Play

Whatever the weather, there’s fun to be had outside. In fact, rainy days are sometimes extra special. Galoshes? Umbrellas? Mud puddles to jump into? Count us in!

Have more suggested outdoors adventures for kids? Leave them in the comments section below!

summerkids

Summer camp kids aren’t afraid of a little mud!

How To: Bagel Birdfeeders with the Habitat Explorers

angrybird

A Habitat Explorer from Propel Braddock Hills, bundled to his beak.

Remember that scene from A Christmas Story when the little brother, Randy, is getting wrapped head to toe like he was going ‘extended deep-sea diving’ to venture out into the snow?

Multiply that operation ten- or twenty-fold, and you’ll have an idea of what our naturalist educators accomplish when they take Habitat Explorer students out in the parks. Once bundled in puffy coats, balaclavas, and lots of animal-themed hats, these 1st graders go on an expedition in the parks to learn about the woods in winter.

Their goal? Exploring the parks woodlands and spotting birds! (And we don’t mean the Angry variety.)

Winter bird watching

Birds need to eat all day long to stay warm in the winter. They can survive without humans because they’re pros at finding seeds on plants all over Pittsburgh to keep them full. As part of our Habitat Explorers curriculum, students learn about local birds and what they eat, then make bagel birdfeeders to hang so that they can observe their feathered friends up close and personal.

hangingfeeders

Faison students hanging their feeders.

How to: Make your own backyard feeder

In just a few steps, you can bring Pittsburgh’s resident winter birds to your backyard by making bagel birdfeeders just like our Habitat Explorers. And since the cold months are a calm time when many birds have finished their migration, learning to identify Pittsburgh’s birds in winter is the time to start. Here’s a helpful resource to get familiar with some common local birds.

A Habitat Explorer filling a container with seeds.

A Habitat Explorer filling a container with seeds.

The materials:

  • A bagel (one bagel will make two feeders)
  • An 8” piece of string for each feeder (cotton or other natural fiber are recommended because they will decompose)
  • Vegetable shortening
  • Seeds
  • A butter knife
  • A sharp knife
  • A plate or shallow container
  • The perfect branch or bush to hang your feeder

The process:

  1. Carefully cut the bagel in half. (Pro tip: It helps do this a day or more ahead of time so it gets stale. The birds don’t mind, and it makes it easier to spread the shortening!)
  2. Tie the string through the hole of the bagel half so it can hang on a tree.
  3. Put birdseed on a plate or shallow container. (No birdseed? Unsalted, flavor-less sunflower seeds, sesame seeds, millet, chopped peanuts, barley, and coarse ground corn meal also work.)
  4. Spread the shortening on the flat side of the bagel. This can be hard for small hands, so be ready to help out!
  5. Press the shortening covered side of the bagel into the seeds so they stick to the shortening.
  6. Gently shake the bagel over the plate or outside to remove excess seeds.
  7. Hang your birdfeeder near your house and watch the birds!
bagelbirdfeeders

Ellis students with their bagel birdfeeders

We recommend hanging your bagel birdfeeder somewhere you can see for best bird spotting. Do you have a tree near a window? Perfect! Birds like to feel secure, so choosing a feeder location in a tree or bush where birds can go to take shelter from cats, hawks and other predators is extra appealing.

Mike Cornell, Naturalist Educator with the Pittsburgh Parks Conservancy

DIY: Autumn Cornucopias

DIY: Autumn Cornucopias

This week, we’re revisiting one of our more popular craft posts to get in the Thanksgiving state of mind. Enjoy! 

I’ve always been jealous of my crafty friends who treat the holiday season like one festive art project. It seems that I lack this genome. The good news is that at the Parks Conservancy, we have horticulturist Angela Yuele. When she showed up in the office one afternoon carrying a cornucopia basket filled with masterfully arranged autumn flowers, we implored her to teach us. You’ll be the one to impress the crowd this Thanksgiving with this absolutely stunning centerpiece that will leave you’re guests asking for the name of your florist. Trust me, if I can do it, so can you.

What You’ll Need

  1. A cornucopia basket
  2. Scissors
  3. Clear floral tape
  4. Wire
  5. An oasis cube (the green spongy thing that holds the flowers together). Soak it in water for 5 minutes and then place it in the plastic tray that comes with it in the bottom of the basket.
  6. Ribbon in your favorite autumn color.
  7. Greens – we used Baker Fern and leaves we cut off the flowers.
  8. Filler – we used Princess Lily, Goldenrod, and St. Johns Wort seed pods.
  9. Accent flowers – we used two colors of mums.

You can get these items at a craft store. For the flowers, you can go to a florist or even purchase an autumn flower arrangement at your grocery store and use those. Angela suggests standing while you arrange the flowers to give you a better perspective.

Secure the Oasis

Use the clear floral tape to secure the oasis to the basket. Go ahead and wrap the tape all the way around the outside of the basket – once all the flowers are in you won’t see it. When wrapping the tape around, make sure to create space between the strips of tape on the oasis so that you won’t have an area where you can’t insert flowers.

Cut Down Your Greens 

Use your scissors to cut the green leaves into smaller pieces. You want a variety of shapes and sizes. It can help to pull away some of the lower leaves so that you have a nice stem to put into the oasis.

Start on the Sides

Start by working the greens along the side of the oasis, allowing them to spill over the edges of the basket.

Cover the Mechanics 

Place the fern leaves in various sizes in the oasis cube so that you cover the cube and tape completely. Put the majority of them into the oasis at a horizontal angle so that you get good coverage. Angela recommends putting one large fern piece straight out of the front to balance the length of the cornucopia basket. The arrangement will look best if it appears horizontal because of the shape of the basket. Use a couple smaller ferns at the top sticking straight up so that the greens will appear to surround the flowers once they are placed.

Put in the Filler

For the Goldenrod, Angela suggests using two larger pieces – one at the front of the arrangement and one at the top – and then breaking the Goldenrod down into smaller pieces to be put in along the sides. As you add the more colorful elements it is important to maintain balance. “Don’t just work the top of the arrangement,” says Angela, “work the sides as well.”

I started to get intimidated when it came time to put in actual flowers. Angela assured me that while there are approaches that tend to be more appealing to the eye, there’s not a wrong way. “The nice thing about flower arranging is that it is open to interpretation,” she says. She suggests beginning by placing a few flowers near the center of the arrangement and then moving out to the sides. “Allow the flowers to spill over the edge,” she encourages. Cut the leaves off the stems before you put them in. I found that the flower stems were less rigid than the ferns, so it works best to hold the flower stem at the very bottom against the oasis to give it support and use your other hand to push from just under the petals to insert it.

I loved the use of the St. Johns Wort seed pods with their friendly pink hue, but berries would give you a very similar effect. Make sure to cut away all the leaves and break the plants down into smaller pieces before you start placing them.

Accent Flowers

Your accent flowers should be a hearty, bright flower. We used two different colors of Mums. Remove all the leaves and break the flowers down into small groupings before you place them. Angela suggests creating a central cluster of three or so at the front of the arrangement and then using the rest of them to balance the arrangement. Don’t forget the sides! Remember that if you place this on a table, your guests will see it at all angles.

The Final Touch

There are a million ways to tie or shape your ribbon. For this one we looped the ribbon three times (trying to vary the size of the loops a little) and held the loops together at the base.

Use a piece of wire to wrap around the base of the ribbon loops and secure.

For a nice detail, you can make what Angela calls “fancy tails” at the ends of your ribbon by cutting little triangles into the ends. When you’re done, place the wire into the oasis at a place in the arrangement that could use a little something extra.

Congratulations – You’re Done!

Congratulations you flower arranging genius you. Now you have a beautiful arrangement to serve as a Thanksgiving centerpiece or gift. And when your very crafty friends ask where you got it you can say, “I made it, no big deal.”

The arrangement should stay fresh looking for about a week. You can water it every couple of days, though it is best to do it over the sink since it will leak through the basket for a little while.

Kathleen Gaines is Senior Manager of Individual giving at the Parks Conservancy. Now if she could just learn how to cook!

Feeling thankful? Give back to the parks that you love by supporting the Park Tree Fund. Click here to get started.